Ajax扩展
# Ajax 扩展
# 客户端模板引擎
# 作用
使用模板引擎提供的模板语法,可以将数据和 HTML 拼接起来。官方地址
# 使用步骤
下载 art-template 模板引擎库文件并在 HTML 页面中引入库文件
<script src="./js/template-web.js"></script>
准备 art-template 模板
<script id="tpl" type="text/html">
    <div class="box"></div>
</script>
2
3
告诉模板引擎将哪一个模板和哪个数据进行拼接
var html = template('tpl', {
    username: 'zhangsan',
    age: '20'
})
2
3
4
将拼接好的html字符串添加到页面中
document.getElementById('container').innerHTML = html
通过模板语法告诉模板引擎,数据和html字符串要如何拼接
<script id="tpl" type="text/html">
    <div class="box"> {{ username }} </div>
</script>
2
3
# 开放外部变量
将外部函数开放到模板中来使用。
示例
设置
//向模板中开放外部变量
template.defaults.imports.dateFormart = function dateFormart(date) {
    let y = date.substr(0, 4)
    let mon = date.substr(4, 2)
    let d = date.substr(6, 2)
    let h = date.substr(8, 2)
    let min = date.substr(10, 2)
    let s = date.substr(12, 2)
    return `${y}年${mon}月${d}日 ${h}时${min}分${s}秒`
}
2
3
4
5
6
7
8
9
10
11
在模板中使用
<script id="tpl" type="text/html">
    <tr>
        <th>时间</th>
        <th>温度</th>
        <th>天气</th>
        <th>风向</th>
        <th>风力</th>
    </tr>
{{each weathers}}
    <tr>
        <th>{{dateFormart($value.update_time)}}</th> //使用开放的变量
        <th>{{$value.degree}}</th>
        <th>{{$value.weather_short}}</th>
        <th>{{$value.wind_direction}}</th>
        <th>{{$value.wind_power}}</th>
    </tr>
{{/each}}
</script>
2
3
4
5
6
7
8
9
10
11
12
13
14
15
16
17
18
# 案例
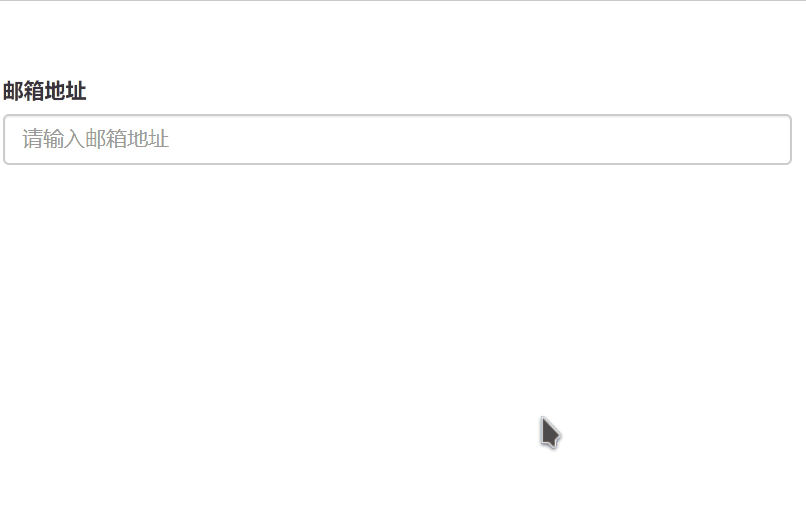
# 验证邮箱唯一性
# 效果
# 步骤
获取文本框并为其添加离开焦点事件
离开焦点时,检测用户输入的邮箱地址是否符合规则
如果不符合规则,阻止程序向下执行并给出提示信息
向服务器端发送请求,检测邮箱地址是否被别人注册
根据服务器端返回值决定客户端显示何种提示信息
客户端页面
<!DOCTYPE html>
<html lang="en">

<head>
	<meta charset="UTF-8">
	<title>验证邮箱地址是否已经注册</title>
	<link rel="stylesheet" href="/assets/bootstrap/dist/css/bootstrap.min.css">
	<style type="text/css">
		p:not(:empty) {
			padding: 15px;
		}

		.container {
			padding-top: 100px;
		}
	</style>
</head>

<body>
	<div class="container">
		<div class="form-group">
			<label>邮箱地址</label>
			<input type="email" class="form-control" placeholder="请输入邮箱地址" id="email">
		</div>
		<!-- 错误 bg-danger 正确 bg-success -->
		<p id="info" style="text-align: center;"></p>
	</div>
	<script src="/js/ajax.js"></script>
	<script>

		let btn = document.getElementById('email')
		let info = document.getElementById('info')
		btn.onblur = function () {
			let email = this.value

			var myreg = /^([a-zA-Z0-9]+[_|\_|\.]?)*[a-zA-Z0-9]+@([a-zA-Z0-9]+[_|\_|\.]?)*[a-zA-Z0-9]+\.[a-zA-Z]{2,3}$/

			if (!myreg.test(email)) {
				info.innerHTML = '格式不符合要求'
				info.className = 'bg-danger'
				return
			}

			var xhr = new XMLHttpRequest()
			var params = `email=${email}`
			xhr.open('get', `http://localhost:3000/verifyEmailAdress?${params}`)
			xhr.send()
			xhr.onload = function () {
				let responseText = xhr.responseText
				let contentType = xhr.getResponseHeader('Content-Type')

				if (contentType.includes('application/json')) {
					responseText = JSON.parse(responseText)
				}

				if (xhr.status == 200) {
					info.className = 'bg-success'
				} else {
					info.className = 'bg-danger'
				}

				info.innerHTML = responseText.message
			}

		}
	</script>
</body>

</html>
2
3
4
5
6
7
8
9
10
11
12
13
14
15
16
17
18
19
20
21
22
23
24
25
26
27
28
29
30
31
32
33
34
35
36
37
38
39
40
41
42
43
44
45
46
47
48
49
50
51
52
53
54
55
56
57
58
59
60
61
62
63
64
65
66
67
68
69
服务端处理
// 邮箱地址验证
app.get('/verifyEmailAdress', (req, res) => {
	// 接收客户端传递过来的邮箱地址
	const email = req.query.email
	// 判断邮箱地址注册过的情况
	if (email == 'itheima@itcast.cn') {
		// 设置http状态码并对客户端做出响应
		res.status(400).send({message: '邮箱地址已经注册过了, 请更换其他邮箱地址'})
	} else {
		// 邮箱地址可用的情况
		// 对客户端做出响应
		res.send({message: '恭喜, 邮箱地址可用'})
	}
})
2
3
4
5
6
7
8
9
10
11
12
13
14
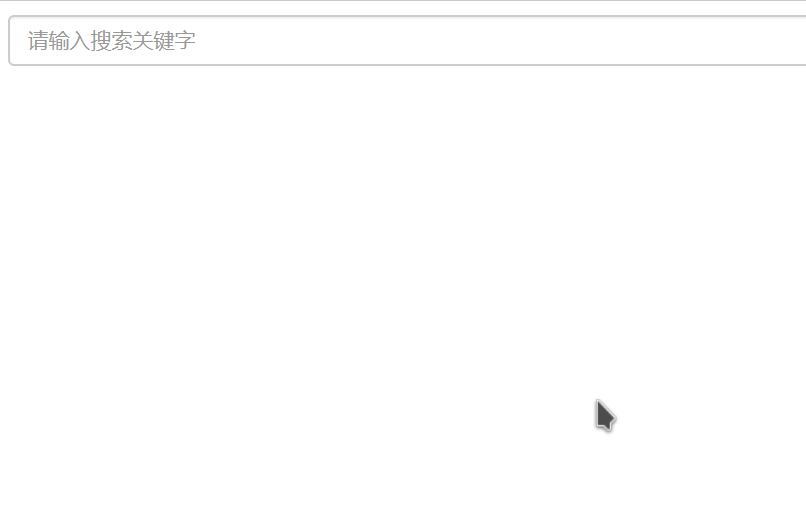
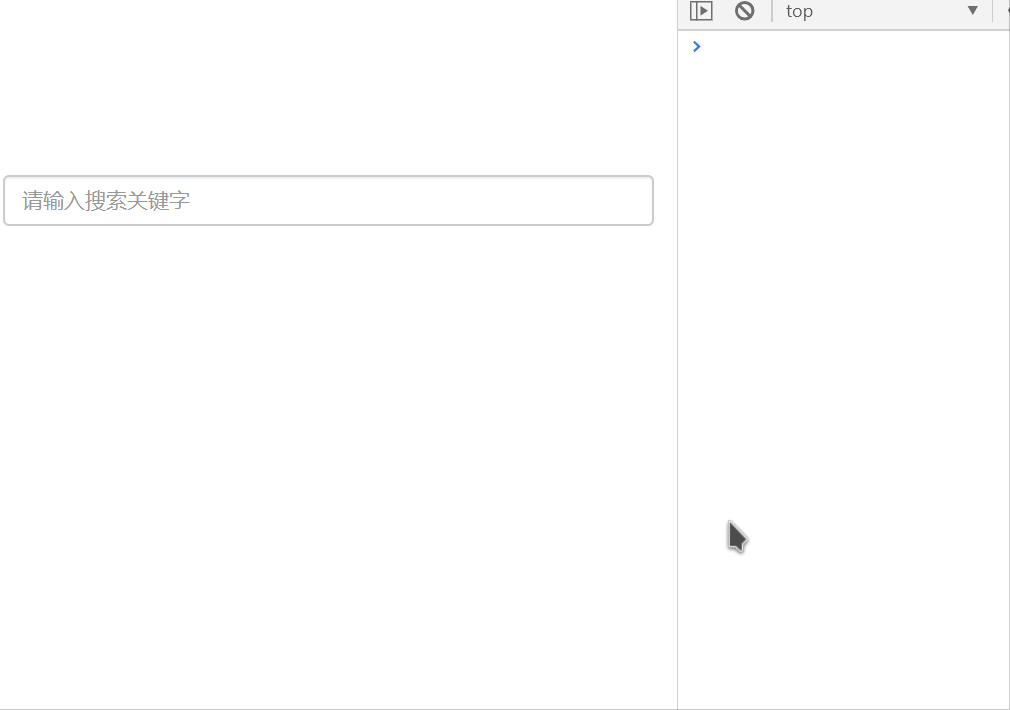
# 搜素框提示
# 效果
# 步骤
获取搜索框并为其添加用户输入事件
获取用户输入的关键字
向服务器端发送请求并携带关键字作为请求参数
将响应数据显示在搜索框底部
客户端
<!DOCTYPE html>
<html lang="en">
<head>
	<meta charset="UTF-8">
	<title>搜索框输入文字自动提示</title>
	<link rel="stylesheet" href="/assets/bootstrap/dist/css/bootstrap.min.css">
	<style type="text/css">
		.container {
			padding-top: 150px;
		}
		.list-group {
			display: none;
		}
	</style>
</head>
<body>
	<div class="container">
		<div class="form-group">
			<input type="text" class="form-control" placeholder="请输入搜索关键字" id="search" autocomplete="off">
			<ul  class="list-group" id="list-box">
				<li>huihuiho</li>
			</ul>
		</div>
	</div>
	<script src="/js/ajax.js"></script>
	<script src="/js/template-web.js"></script>
	<script id="tpl" type="text/html">
		{{each lis}}
		<li class="list-group-item">{{$value}}</li>
		{{/each}}
	</script>
	<script>
		let search  = document.getElementById('search')
		let listBox  = document.getElementById('list-box')
		search.oninput = function () {
			let queryString = search.value

			let xhr = new XMLHttpRequest()

			xhr.open('get', `http://localhost:3000/searchAutoPrompt?key=${queryString}`)

			xhr.send()

			xhr.onload = function () {
				let contentType = xhr.getResponseHeader('Content-Type')
				let responseText = xhr.responseText
				console.log(contentType)
				if (contentType.includes('application/json')) {
					responseText = JSON.parse(responseText)
				}
				console.log(responseText)
				let lis = template('tpl', { lis: responseText })
				listBox.style.display = 'block'
				listBox.innerHTML = lis

			}
		}
	</script>
</body>
</html>
2
3
4
5
6
7
8
9
10
11
12
13
14
15
16
17
18
19
20
21
22
23
24
25
26
27
28
29
30
31
32
33
34
35
36
37
38
39
40
41
42
43
44
45
46
47
48
49
50
51
52
53
54
55
56
57
58
59
60
服务端
// 输入框文字提示
app.get('/searchAutoPrompt', (req, res) => {
    // 搜索关键字
    const key = req.query.key;
    if (!key) {
        return res.send([])
    }
    // 提示文字列表
    const list = [
        '威少大三双38+19+20',
        '威少重回雷霆主场',
        '威少哈登合砍80分',
        '神龟获得MVP',
        '威少夺冠',
        '威少隔扣詹姆斯',
        '威少参军',
        '威少学习java',
        '震惊!威少转行IT',
        '威少学习c++',
        '威少---p10级别程序员'
    ];
    // 搜索结果
    let result = list.filter(item => item.includes(key));
    // 将查询结果返回给客户端
    res.send(result);
})
2
3
4
5
6
7
8
9
10
11
12
13
14
15
16
17
18
19
20
21
22
23
24
25
26
# 存在问题
向上面那样,每当输入一个字符 oninput 事件就触发一次,就像服务器发送一次请求,这样先让你是不合理的。
# 解决方案 节流
在每一次触发 oninput 事件后清除上一次设置的延时定时器,然后又重新开启一个新的延时定时器 400ms 后发送请求。在 400ms 内连续触发的 oninput 事件无效(认为用户在连续输入),事件触发超过 400ms 后还没有事件触发那么认为这一次触发事件后就是输入完成,可以发送请求。
let timer = null
let search = document.getElementById('search')
let listBox = document.getElementById('list-box')

search.oninput = function () {
    clearTimeout(timer)
    //开启定时器,延迟发送请求
    timer = setTimeout(() => {
        let queryString = search.value
        let xhr = new XMLHttpRequest()
        if (!queryString) {
            clearTimeout(timer)
            listBox.style.display = 'none'
            return
        }
        xhr.open('get', `http://localhost:3000/searchAutoPrompt?key=${queryString}`)

        xhr.send()
        console.log('发送一次请求')
        xhr.onload = function () {
            let contentType = xhr.getResponseHeader('Content-Type')
            let responseText = xhr.responseText
            if (contentType.includes('application/json')) {
                responseText = JSON.parse(responseText)
            }
            let lis = template('tpl', { lis: responseText })
            listBox.style.display = 'block'
            listBox.innerHTML = lis
        }
    },400)

}
2
3
4
5
6
7
8
9
10
11
12
13
14
15
16
17
18
19
20
21
22
23
24
25
26
27
28
29
30
31
32
33
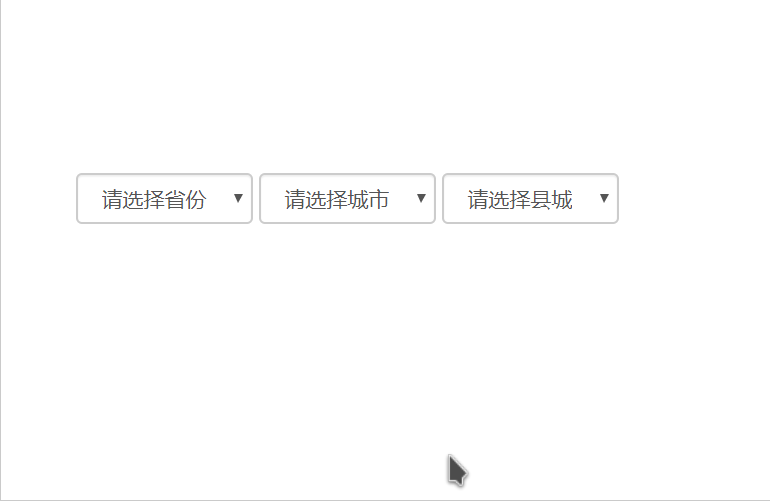
# 省市区三级联动
# 效果
客户端
let province = document.getElementById('province')
let citySelect = document.getElementById('city')
let areaSelect = document.getElementById('area')
//获取省份信息
ajax({
    type: 'get',
    url: 'http://localhost:3000/province',
    success: function (result) {
        let optionsTpl = template('optionsTpl', {
            tag: '请选择省份',
            options: result
        })
        province.innerHTML = optionsTpl
    },
    error: function (result) {
        console.log('失败' + result)
    }
})

//选择省份后,请求对应的城市信息
province.onchange = function () {
    let selectid = this.value
    console.log(selectid)
    if (!selectid) {
        render('optionsTpl', '请选择县城', [], areaSelect)
        render('optionsTpl', '请选择城市', [], citySelect)
        return
    }
    ajax({
        type: 'get',
        url: `http://localhost:3000/cities`,
        data: {
            id: selectid
        },
        success: function (cities) {
            render('optionsTpl', '请选择城市', cities, citySelect)
        },
        error: function () {

        }
    })
}

//城市选择后,请求县城信息
citySelect.onchange = function () {
    let selectid = this.value
    console.log(selectid)
    if (!selectid) {
        render('optionsTpl', '请选择县城', [], areaSelect)
        return
    }
    ajax({
        type: 'get',
        url: 'http://localhost:3000/areas',
        data: {
            id: selectid
        },
        success: function (areas) {
            render('optionsTpl', '请选择县城', areas, areaSelect)
        },
        error: function () {

        }
    })
}

//渲染下拉选择框的函数
function render (tplId, tag, options, container) {
    let optionsTpl = template(tplId, {tag, options})
    container.innerHTML = optionsTpl
}
2
3
4
5
6
7
8
9
10
11
12
13
14
15
16
17
18
19
20
21
22
23
24
25
26
27
28
29
30
31
32
33
34
35
36
37
38
39
40
41
42
43
44
45
46
47
48
49
50
51
52
53
54
55
56
57
58
59
60
61
62
63
64
65
66
67
68
69
70
71
服务端
// 获取省份
app.get('/province', (req, res) => {
    res.json([{
        id: '001',
        name: '黑龙江省'
    },{
        id: '002',
        name: '四川省'
    },{
        id: '003',
        name: '河北省'
    },{
        id: '004',
        name: '江苏省'
    }]);
});

// 根据省份id获取城市
app.get('/cities', (req, res) => {
    // 获取省份id
    const id = req.query.id;
    console.log(id)
    // 城市信息
    const cities = {
        '001': [{
            id: '300',
            name: '哈尔滨市'
        }, {
            id: '301',
            name: '齐齐哈尔市'
        }, {
            id: '302',
            name: '牡丹江市'
        }, {
            id: '303',
            name: '佳木斯市'
        }],
        '002': [{
            id: '400',
            name: '成都市'
        }, {
            id: '401',
            name: '绵阳市'
        }, {
            id: '402',
            name: '德阳市'
        }, {
            id: '403',
            name: '攀枝花市'
        }],
        '003': [{
            id: '500',
            name: '石家庄市'
        }, {
            id: '501',
            name: '唐山市'
        }, {
            id: '502',
            name: '秦皇岛市'
        }, {
            id: '503',
            name: '邯郸市'
        }],
        '004': [{
            id: '600',
            name: '常州市'
        }, {
            id: '601',
            name: '徐州市'
        }, {
            id: '602',
            name: '南京市'
        }, {
            id: '603',
            name: '淮安市'
        }]
    }
    // 响应
    res.send(cities[id]);
});

// 根据城市id获取县城
app.get('/areas', (req, res) => {
    // 获取城市id
    const id = req.query.id;
    // 县城信息
    const areas = {
        '300': [{
            id: '20',
            name: '道里区',
        }, {
            id: '21',
            name: '南岗区'
        }, {
            id: '22',
            name: '平房区',
        }, {
            id: '23',
            name: '松北区'
        }],
        '301': [{
            id: '30',
            name: '龙沙区'
        }, {
            id: '31',
            name: '铁锋区'
        }, {
            id: '32',
            name: '富拉尔基区'
        }]
    };
    // 响应
    res.send(areas[id] || []);
});
2
3
4
5
6
7
8
9
10
11
12
13
14
15
16
17
18
19
20
21
22
23
24
25
26
27
28
29
30
31
32
33
34
35
36
37
38
39
40
41
42
43
44
45
46
47
48
49
50
51
52
53
54
55
56
57
58
59
60
61
62
63
64
65
66
67
68
69
70
71
72
73
74
75
76
77
78
79
80
81
82
83
84
85
86
87
88
89
90
91
92
93
94
95
96
97
98
99
100
101
102
103
104
105
106
107
108
109
110
111
112
113
114
# 同源政策
# Ajax请求限制
Ajax 只能向自己的服务器发送请求。比如现在有一个 A 网站、有一个 B 网站,A 网站中的 HTML 文件只能向 A网站服务器中发送 Ajax 请求,B 网站中的 HTML 文件只能向 B 网站中发送 Ajax 请求,但是 A 网站是不能向 B 网站发送 Ajax 请求的,同理,B 网站也不能向 A 网站发送 Ajax 请求。由于浏览器的同源政策所以 Ajax 不能跨域请求。
# 同源政策概述
如果两个页面拥有相同的 协议、域名和端口 ,那么这两个页面就属于同一个源,其中只要有一个不相同,就是不同源。
http://www.example.com/dir/page.html
//与上面网址对比
http://www.example.com/dir2/other.html:同源
http://example.com/dir/other.html:不同源(域名不同)
http://v2.www.example.com/dir/other.html:不同源(域名不同)
http://www.example.com:81/dir/other.html:不同源(端口不同)
https://www.example.com/dir/page.html:不同源(协议不同)
2
3
4
5
6
7
# 同源政策的目的
同源政策是为了保证用户信息的安全,防止恶意的网站窃取数据。最初的同源政策是指 A 网站在客户端设置的 Cookie,B 网站是不能访问的。
随着互联网的发展,同源政策也越来越严格,在不同源的情况下,其中有一项规定就是无法向非同源地址发送 Ajax 请求,如果请求,浏览器就会报错。
# 同源政策测试
测试非同源Ajax请求
服务器 2 的 app.js
const express = require('express')
const app = express()

app.get('/test', (req, req) => {
	res.send('ok')
})
app.listen(3001)
2
3
4
5
6
7
服务器 1 中的 Ajax 请求
var xhr = new XMLHttpRequest()
xhr.open('get', 'http://localhost:3001/test')
xhr.send()
xhr.onload = function () {
    if (xhr.status === 200) {
        console.log(xhr.responseText)
    }
}
2
3
4
5
6
7
8
得到结果

实际上请求已经发送出去了,但是被浏览器拒绝了。
# JSONP 解决同源限制
Jsonp(将json数据填充在函数中返回给客户端)是json with padding的缩写,它不是Ajax请求,但它可以模拟Ajax请求。
# 步骤
首先将不同源的请求地址写在script标签的src属性中。script标签的src属性是不受同源政策所影响的,如引入jQuery。
<script src=“https://cdn.bootcss.com/jquery/3.3.1/jquery.min.js"></script>
<script src="www.example.com"></script>
2
注意
script 标签的 src 属性的连接不一定是以 js 文件结尾,可以是任意地址,但是返回值必须是合法的 JavaScript 代码
不同源服务端响应数据必须是一个函数的调用,真正要发送给客户端的数据需要作为函数调用的参数。
const data = 'fn({name: "张三", age: "20"})'
res.send(data)
2
在客户端全局作用域下定义函数 fn
function fn (data) { }
在 fn 函数内部对服务器端返回的数据进行处理
function fn (data) { console.log(data); }
完整示例
app.js
const express = require('express')
const app = express()

app.get('/test', (req, res)=>{
    res.send(`fn('ok')`)
})

app.listen(3001)
2
3
4
5
6
7
8
客户端页面 (http://localhost:3000)
<script>
    function fn (data) {
        console.log('客户端的fn函数被调用了')
        console.log(data);
    }
</script>
<!-- 1.将非同源服务器端的请求地址写在script标签的src属性中 -->
<script src="http://localhost:3001/test">
	//从不同源的服务器请求回来的代码 fn('ok') 执行 fn 函数 ,`ok` 作为形参传入
</script>
2
3
4
5
6
7
8
9
10
结果

# 👉 优化一 函数名称问题
由于不同源服务端返回的函数名称可能前端已经使用了,就会造成命名冲突。为了解决这个问题,要求客户端请求时加上函数名称。
优化后的代码
客户端
<script>
   function fn2 (data) {
       console.log('客户端的fn函数被调用了')
       console.log(data);
   }
</script>
<!-- 1.将非同源服务器端的请求地址写在script标签的src属性中 -->
<script src="http://localhost:3001/better?callback=fn2"></script>
2
3
4
5
6
7
8
不同源服务端
app.get('/better', (req, res)=>{
    const funName = req.query.callback
    let data = {
        name: '张三'
    }
    data = JSON.stringify(data)
    const result = `${funName}(${data})` // fn2({name: '张三'})
    res.send(result)
})
2
3
4
5
6
7
8
9
# 👉优化二 请求执行控制
之前的请求都是页面一加载就执行了,都不能满足想什么时候执行就什么时候执行的需求。所以用 动态创建 script 标签 来解决问题。
完整示例
按钮点击后动态创建script标签并设置好scr属性,再追加到页面中,添加到页面上时,立马发送请求,当触发script加载完成事件(script.onload)后,再删除添加的script标签,最终实现了点击后再发送请求。
客户端
<!DOCTYPE html>
<html lang="en">
    <head>
        <meta charset="UTF-8">
        <title>Document</title>
    </head>
    <body>
        <button id="btn">点我发送请求</button>
        <script>
            function fn2 (data) {
                console.log('客户端的fn函数被调用了')
                console.log(data);
            }
        </script>
        <script type="text/javascript">
            let btn = document.getElementById('btn')
            btn.onclick = function() {
                let script = document.createElement('script')
                script.src = 'http://localhost:3001/better?callback=fn2'
                document.body.appendChild(script)
                script.onload = function () {
                    console.log('请求完成删除script标签')
                    document.body.removeChild(script)
                }
            }
        </script>
    </body>
</html>
2
3
4
5
6
7
8
9
10
11
12
13
14
15
16
17
18
19
20
21
22
23
24
25
26
27
28
不同源服务端
app.get('/better', (req, res)=>{
    const funName = req.query.callback
    let data = {
        name: '张三'
    }
    data = JSON.stringify(data)
    const result = `${funName}(${data})`
    res.send(result)
})
2
3
4
5
6
7
8
9
# 👉优化三封装JSONP函数 (res.jsonp)
对于之前的代码来说,每实现一次请求就要写一边重复的代码,所以把 封装一个 JSONP 函数来简化代码
jsonp 函数,接收一个对象作为参数,对象结构如下
{
    url: '...', //请求地址
    data: { //请求数据
        //...
    },
    success: function () {//请求成功后执行的函数,在函数中获取服务器返回的数据
        //...
    }
}
2
3
4
5
6
7
8
9
jsonp函数完整示例
function jsonp(options) {
    var script = document.createElement('script')
    //随机函数名,请求成功后执行的函数,(从中获取返回的数据)
    var funName = 'myJSONP' + Math.random().toString().replace('.', '')
    var params = ''
    // 解析参数
    for (var attr in options.data) {
        params += `${attr}=${options.data[attr]}&`
    }
    //把请求成功后执行的函数暴露在全局中
    window[funName] = options.success
    //设置script的src属性
    script.src = options.url + '?' + params + `callback=${funName}`
    //添加到页面中
    document.body.appendChild(script)
    //加载完成后触发
    script.onload = function () {
        console.log('请求完成,删除script标签')
        document.body.removeChild(script)
    }
}
2
3
4
5
6
7
8
9
10
11
12
13
14
15
16
17
18
19
20
21
函数注意点
- 随机函数名
//随机函数名
var funName = 'myJSONP' + Math.random().toString().replace('.', '')
2
- 定义全局函数
//把请求成功后执行的函数暴露在全局中
window[funName] = options.success
2
使用
客户端
let btn = document.getElementById('btn')
btn.onclick = function () {
    //调用jsonp函数,并传入指定对象作为参数
    jsonp({
        url: 'http://localhost:3001/better2', //请求地址
        data: { //数据
            name: '张三',
            age: 12
        },
        success: function (data) { //请求完成执行的函数 ,获取服务器返回的数据
            console.log(data)
        }
    })
}
2
3
4
5
6
7
8
9
10
11
12
13
14
不同源服务端
app.get('/better2', (req, res)=>{
    console.log(req.query.name)
    let funName = req.query.callback
    let data = {
        name: req.query.name,
        age: req.query.age,
        stauts: 'ban'
    }
    data = JSON.stringify(data)
    let result = `${funName}(${data})`
    res.send(result)
})

//优化后的代码 使用 res.josnp方法
app.get('/better2', (req, res)=>{
	res.jsonp({
		name: req.query.name,
		age: req.query.age,
		status: 'ban'
	})
})
2
3
4
5
6
7
8
9
10
11
12
13
14
15
16
17
18
19
20
21
22
注意
express 框架中提供了res.jsonp方法,替我们完成了要返回的函数调用代码字符串的拼接,只需要传入要返回的数据即可,大大简化了操作。
# 原理总结
- 首先使用
script的src属性的不受同源政策约束的特点,创建script元素并设置src属性为请求地址。 - 然后在客户端中定义一个函数,该函数用来获取不同源服务端返回的数据(数据从函数的形参中返回)。
- 把
script元素追加到页面中,然后script标签就向指定地址发送请求。注意!发送的请求中不仅包含要传递的数据,还要把获用来取数据的函数的名字一起提交到服务器端。 - 不同源服务端接收到前端的请求,获取请求参数。得到传来的函数(
fun)名字,并将要返回的数据以json的格式 拼接到函数fun调用的代码字符串中。如:'fun({“name”: "张三", “age”: "20"})'这样的函数调用代码的字符串。 - 客户端给收到不同源服务端返回的函数执行的代码。立即执行这句代码执行函数,由于该函数之前已经定义好了,所以正常执行就
ok了。
由此可知:客户端定义的函数可以从形参中得到数据的原因是,不同源服务端返回了一个(传入了一个数据作为形参的同名函数的调用的js代码)。如:'fun({name: "张三", age: "20"})' 这样的函数调用代码的字符串。
# CORS 跨域共享解决同源政策
# 概述
CORS:全称为 Cross-origin resource sharing,即跨域资源共享,它允许浏览器向跨域服务器发送 Ajax 请求,克服了 Ajax 只能同源使用的限制。

在跨域请求时,请求头中有 origin 字段保存了发起请求的网站的域名信息。如origin: http://localhost:3000。服务器会根据此字段,判读是否同意此次请求。无论服务器是否同意此次请求,都会给客户端一个正常的响应。如果服务器同意此次请求则在响应头中添加 Access-Control-Allow-Origin 字段(Access-Control-Allow-Origin: 'http://localhost:3000'或者是 Access-Control-Allow-Origin: '*'),如果拒绝那么响应头中就没有该字段。
Access-Control-Allow-Origin 可以理解为允许跨域访问的白名单。
Access-Control-Allow-Origin: 'http://localhost:3000' 允许该域名的请求。
Access-Control-Allow-Origin: '*' 允许所有的客户端请求。
# 示例
客户端
<body>
    <button id="btn">点我发送请求</button>
    <script src="/js/ajax.js"></script>
    <script>
        // 获取按钮
        var btn = document.getElementById('btn');
        // 为按钮添加点击事件
        btn.onclick = function () {
            ajax({
                type: 'get',
                url: 'http://localhost:3001/cross',
                success: function (data) {
                    console.log(data)
                }
            })
        };
    /script>
</body>
2
3
4
5
6
7
8
9
10
11
12
13
14
15
16
17
18
服务端
需要在响应头中设置:
- 允许哪些客户端访问服务器端。
'Access-Control-Allow-Origin', '*' - 客户端可以通过哪些请求方法来访问服务器端 (
GET or POST、only GET、only POST) 。'Access-Control-Allow-Methods', 'get, post'
app.get('/cross', (req, res) => {
    //允许哪些客户端访问
    //* 代表所有的用户
    res.header('Access-Control-Allow-Origin', '*')
    //允许客户端使用哪些请求方法访问 get 或这 post 皆可
    res.header('Access-Control-Allow-Methods', 'get, post')
    res.send('数据')
})

//优化,对所有的请求设置响应头。
app.use((req, res, next) => {
    res.header('Access-Control-Allow-Origin', '*');
    res.header('Access-Control-Allow-Methods', 'GET, POST');
    next();
})
2
3
4
5
6
7
8
9
10
11
12
13
14
15
结果 请求成功
# 访问非同源数据服务器端解决方案 (第三方模块requst)
# 概述
同源政策是浏览器给予 Ajax 技术的限制,服务器端是不存在同源政策限制。由于客户端不能直接通过 Ajax 跨域请求得到数据,又因为客户端不存在这样的问题,所以通过服务端解决此问题。
解决方案图

请求流程:
A 浏览器请求 A 服务器,A 服务器在请求 B 服务器,A 服务器从 B 服务器得到响应后,再响应回 A 浏览器。
# 使用第三方模块 requst
该模块是向其他服务器端请求数据的模块
引入
const requst = require('requst')
request 函数接收两个参数
参数一:需要请求的地址。
参数二:请求回调函数。回调函数中有三个形参分别是 error 错误对象、 response 响应对象 、 body 响应的内容
完整示例
客户端
// 获取按钮
var btn = document.getElementById('btn');
// 为按钮添加点击事件
btn.onclick = function () {
    ajax({
        type: 'get',
        url: 'http://localhost:3000/server',
        success: function (data) {
            console.log(data);
        }
    })
};
2
3
4
5
6
7
8
9
10
11
12
服务器一 (http://localhost:3000)
// 向其他服务器端请求数据的模块 request
const request = require('request');

app.get('/server', (req, res) => {
    request('http://localhost:3001/cross', (err, response, body) => {
        res.send(body)
    })
})
2
3
4
5
6
7
8
9
服务器二 (http://localhost:3001)
app.get('/cross', (req, res) => {
    res.send('数据')
})
2
3
# withCredentials属性
# 概述
在不跨域的情况下,客户端请求会自动把 cookie 发送到服务器端,服务器从而获取客户端信息,但是在跨域的情况下(出于安全性的考虑)是不会携带 cookie 信息的。在使用 Ajax 时候默认不会在请求中携带 cookie 信息。
要满足 Ajax 跨域请求携带 cookie 的需求:在 Ajax 对象中有一个属性withCredentials可以指定在涉及到跨域请求时,是否携带 cookie 信息,默认值为 false。只设置这个属性是不行的,还要在服务端的响应头中添加Access-Control-Allow-Credentials属性。如果设置为 true 允许客户端发送请求时携带 cookie。
# 案例跨域登录
客户端
<div class="container">
    <form id="loginForm">
        <div class="form-group">
            <label>用户名</label>
            <input type="text" name="username" class="form-control" placeholder="请输入用户名">
        </div>
        <div class="form-group">
            <label>密码</label>
            <input type="password" name="password" class="form-control" placeholder="请输入用密码">
        </div>
        <input type="button" class="btn btn-default" value="登录" id="loginBtn">
        <input type="button" class="btn btn-default" value="检测用户登录状态" id="checkLogin">
    </form>
</div>
2
3
4
5
6
7
8
9
10
11
12
13
14
var loginBtn = document.getElementById('loginBtn')
var checkLogin = document.getElementById('checkLogin')
var form = document.getElementById('loginForm')

loginBtn.onclick = function () {
    var formData = new FormData(form)
    var xhr = new XMLHttpRequest()
    xhr.open('post', 'http://localhost:3001/login')
    //当发送跨域请求时携带cookie信息
    xhr.withCredentials = true
    xhr.send(formData)
    xhr.onload = function () {
        console.log(xhr.responseText)
    }
}

checkLogin.onclick = function () {
    var xhr = new XMLHttpRequest()
    xhr.open('get', 'http://localhost:3001/checkLogin')
    //当发送跨域请求时携带cookie信息
    xhr.withCredentials = true
    xhr.send()
    xhr.onload = function () {
        console.log(xhr.responseText)
    }
}
2
3
4
5
6
7
8
9
10
11
12
13
14
15
16
17
18
19
20
21
22
23
24
25
26
跨域服务端
// 引入express框架
const express = require('express');
var session = require('express-session');
// 创建web服务器
const app = express();
// 实现session功能
app.use(session({
  secret: 'keyboard cat',
  resave: false,
  saveUninitialized: false
}));

app.use((req, res, next) => {
    // 1.允许哪些客户端访问我
    // * 代表允许所有的客户端访问我
    // 注意:如果跨域请求中涉及到cookie信息传递,值不可以为*号 要填的值,比如是具体的域名信息
    res.header('Access-Control-Allow-Origin', 'http://localhost:3000')
    // 2.允许客户端使用哪些请求方法访问我
    res.header('Access-Control-Allow-Methods', 'get,post')
    // 允许客户端发送跨域请求时携带cookie信息
    res.header('Access-Control-Allow-Credentials', true);
    next();
})


app.post('/login', (req, res) => {
	// 创建表单解析对象
	var form = formidable.IncomingForm();
	// 解析表单
	form.parse(req, (err, fields, file) => {
		// 接收客户端传递过来的用户名和密码
		const { username, password } = fields;
		// 用户名密码比对
		if (username == 'itheima' && password == '123456') {
			// 设置session
			req.session.isLogin = true;
			res.send({message: '登录成功'});
		} else {
			res.send({message: '登录失败, 用户名或密码错误'});
		}
	})
});

app.get('/checkLogin', (req, res) => {
	// 判断用户是否处于登录状态
	if (req.session.isLogin) {
		res.send({message: '处于登录状态'})
	} else {
		res.send({message: '处于未登录状态'})
	}
});
2
3
4
5
6
7
8
9
10
11
12
13
14
15
16
17
18
19
20
21
22
23
24
25
26
27
28
29
30
31
32
33
34
35
36
37
38
39
40
41
42
43
44
45
46
47
48
49
50
51
#
# jQuery 中的 $.Ajax 方法
# 概述
它的作用是发送 Ajax 请求。
# 使用
$.ajax 方法接收一个对象作为参数,对象结构如下:
{	 //请求方式
     type: 'get',
     //请求地址
     url: 'http://www.example.com',
     data: { name: 'zhangsan', age: '20' },

     contentType: 'application/x-www-form-urlencoded',
     beforeSend: function () {
         return false
     },
     success: function (response) {},
     error: function (xhr) {}
}
2
3
4
5
6
7
8
9
10
11
12
13
type:请求方式
url:请求地址
data:请求参数。请求参数 可以参数传递字符串(name=cyx&age=22)。传递对象的话,会自动被拼接成参数字符串。(name=cyx&age=220)。还可以传递 json 字符串,但是同时要设置参数类型 Content-Type 。
contentType:设置请求参数的格式。默认值为 application/x-www-form-urlencoded。json 格式:application/json
beforeSend:请求执行之前做一些事情。如:可以对请求参数的值进行格式验证,如果不满足要求 return false 结束此次请求。还可以显示请求等待图片。
success:请求成功后,服务端返回数据,调用此函数。形参就是返回的数据。
error:请求失败时执行函数,形参 xhr 对象。
# 案例
# 基本使用
页面
<button id="btn">发送请求</button>
<script src="/js/jquery.min.js"></script>
<script>
    $('#btn').on('click', function () {
    $.ajax({
        // 请求方式
        type: 'get',
        // 请求地址
        url: '/base',
        // 请求成功以后函数被调用
        success: function (response) {
            // response为服务器端返回的数据
            // 方法内部会自动将json字符串转换为json对象
            console.log(response);
        },
        // 请求失败以后函数被调用
        error: function (xhr) {
            console.log(xhr)
        }
    })
});
</script>
2
3
4
5
6
7
8
9
10
11
12
13
14
15
16
17
18
19
20
21
22
app.js
app.get('/base', (req, res) => {
    res.send({
        name: 'zhangsan',
        age: 30
    })
})
2
3
4
5
6
# 发送请求参数
get 参数
$('#btn').on('click', function () {
    $.ajax({
        // 请求方式
        type: 'get',
        // 请求地址
        url: '/user',
        // 向服务器端发送的请求参数
        //data:{ name: zhangsam ,age:12}
        data: 'name=zhangsan&age=100',
        // 指定参数的格式类型
        contentType: 'application/json',
        // 请求成功以后函数被调用
        success: function (response) {
            // response为服务器端返回的数据
            // 方法内部会自动将json字符串转换为json对象
            console.log(response);
        }
    })
});
2
3
4
5
6
7
8
9
10
11
12
13
14
15
16
17
18
19
post一般参数
$('#btn').on('click', function () {
    $.ajax({
        // 请求方式
        type: 'post',
        // 请求地址
        url: '/user',
        // 向服务器端发送的请求参数
        data: {
            name: 'zhangsan',
            age: 100
        },
        // 请求成功以后函数被调用
        success: function (response) {
            // response为服务器端返回的数据
            // 方法内部会自动将json字符串转换为json对象
            console.log(response);
        }
    })
});
2
3
4
5
6
7
8
9
10
11
12
13
14
15
16
17
18
19
postjson格式参数
var params = {name: 'wangwu', age: 300}
$('#btn').on('click', function () {
    $.ajax({
        // 请求方式
        type: 'post',
        // 请求地址
        url: '/user',
        // 向服务器端发送的请求参数
        data: JSON.stringify(params),
        // 指定参数的格式类型
        contentType: 'application/json',
        // 请求成功以后函数被调用
        success: function (response) {
            // response为服务器端返回的数据
            // 方法内部会自动将json字符串转换为json对象
            console.log(response);
        }
    })
});
2
3
4
5
6
7
8
9
10
11
12
13
14
15
16
17
18
19
# $.ajax 方法发送 jsonp 请求
在调用 $.ajax 方法时,传入一个参数 dataType: ‘jsonp’ 就代表要发送 jsonp 请求(跨域请求)。若不传入这个参数则默认是同源的 Ajax请求
使用
$('#btn').on('click', function () {
    $.ajax({
        url: '/jsonp',
        // 代表现在要发送的是jsonp请求
        dataType: 'jsonp',
        success: function (response) {
            console.log(response)
        }
    })
})
2
3
4
5
6
7
8
9
10
更多属性
jsonp、jsonCallback 是连个可选参数。jsonp 属性修改 callback 参数名称。jsonCallback 指定函数名称
//请求成功后执行的函数
function fn (response) {
    console.log(response)
}

$('#btn').on('click', function () {
    $.ajax({
        url: '/jsonp',
        // 向服务器端传递函数名字的参数名称 (?cb=funName)
        jsonp: 'cb',
        //设置请求结束后执行的函数
        jsonpCallback: 'fn',
        // 代表现在要发送的是jsonp请求
        dataType: 'jsonp'
    })
})
2
3
4
5
6
7
8
9
10
11
12
13
14
15
16
app.js
app.get('/jsonp', (req, res) => {
    const cb = req.query.cb
    const data = cb+"({name: 'zhaoliu'})"
    res.send(data)
})
2
3
4
5
# jQuery 中serialize 方法
作用:将表单中的数据自动拼接成字符串类型的参数
var params = $('#form').serialize();
// name=zhangsan&age=30
2
这样任然不方便,得到表单的数据后,是一个字符串,我们希望是一个对象更便于操作。下面我们自定义一个函数 serializeObject 来返回一个包含表单数据的对象。
// 将表单中用户输入的内容转换为对象类型
function serializeObject(obj) {
    // 处理结果对象
    var result = {};
    // [{name: 'username', value: '用户输入的内容'}, {name: 'password', value: '123456'}]
    var params = obj.serializeArray();

    // 循环数组 将数组转换为对象类型
    $.each(params, function (index, value) {
        result[value.name] = value.value;
    })
    // 将处理的结果返回到函数外部
    return result;
}

//使用
$('#form').on('submit', function () {
    // 将表单内容拼接成字符串类型的参数
    console.log(serializeObject($(this)))
    return false;
});
2
3
4
5
6
7
8
9
10
11
12
13
14
15
16
17
18
19
20
21
注意
serializeArray() 方法是 jQuery 提供的一个函数,属于 jQuery 表单元素下的方法,它的作用是获取表单的控件的值,返回一个数组,结构如下:
[
    {
        name: 'username',
        value: '昌宇玺'
    },
    {
        name: 'password',
        value: '123456'
    },
    ...
]

//使用
var params = $('#form').serializeArray();
2
3
4
5
6
7
8
9
10
11
12
13
14
# $.post\ $.get
这两个方法的使用方式是一样的,接收三个参数。
参数一:请求地址
参数二:请求参数
参数三:回调函数
使用
$.get('http://www.example.com', {name: 'zhangsan', age: 30}, function (response) {}) $.post('http://www.example.com', {name: 'lisi', age: 22}, function (response) {})
$.get('/base', 'name=zhangsan&age=31', function (response) {
    console.log(response)
})

$.post('/base', function (response) {
    console.log(response)
})
2
3
4
5
6
7
#
# jQuery 中 Ajax 全局事件
只要有 Ajax 请求发送,对应的全局事件就会触发。
ajaxStart() 请求开始发送时触发。
ajaxComplete() 请求完成时触发。
这两个全局事件一定要绑定在 document 上。
示例 发送请求时显示进度条
//引入css 和 js 文件
<link rel="stylesheet" href="/js/nprogress/nprogress.css">
<script src="/js/nprogress/nprogress.js"></script>

//页面中有ajax请求时触发
$(document).on('ajaxStart', function () {
    NProgress.start()
})
//页面中ajax请求完成时触发
$(document).on('ajaxComplete', function () {
    NProgress.done()
})
2
3
4
5
6
7
8
9
10
11
12